Hugo, Gitlab and Pipelines
Table of Contents
I’ve decided to try and document the useful workflows and code I’ll generate during my upcoming new job. Here’s how I went about automating the creation of these blog pages and publishing of this blog to a directory on my web server. I’ll first focus on the process and code, then at the bottom of this page will be descriptions about why I’ve chosen these tools and specific workflow.
Tools#
- Hugo: A open-source static site generator
- Ananke: The Hugo theme used for the blog
- GitLab: SCM (Source Code Management) tool/site including CI pipelines
- VS Code: My preferred code editing platform
- GitKraken: A GUI for git because I’m lazy sometimes
Workflow#
- Init a repo It’s easiest to setup a git repository first, then proceed with all the remaining steps by creating the files in the repo directory. To do this manually:
git-init blog
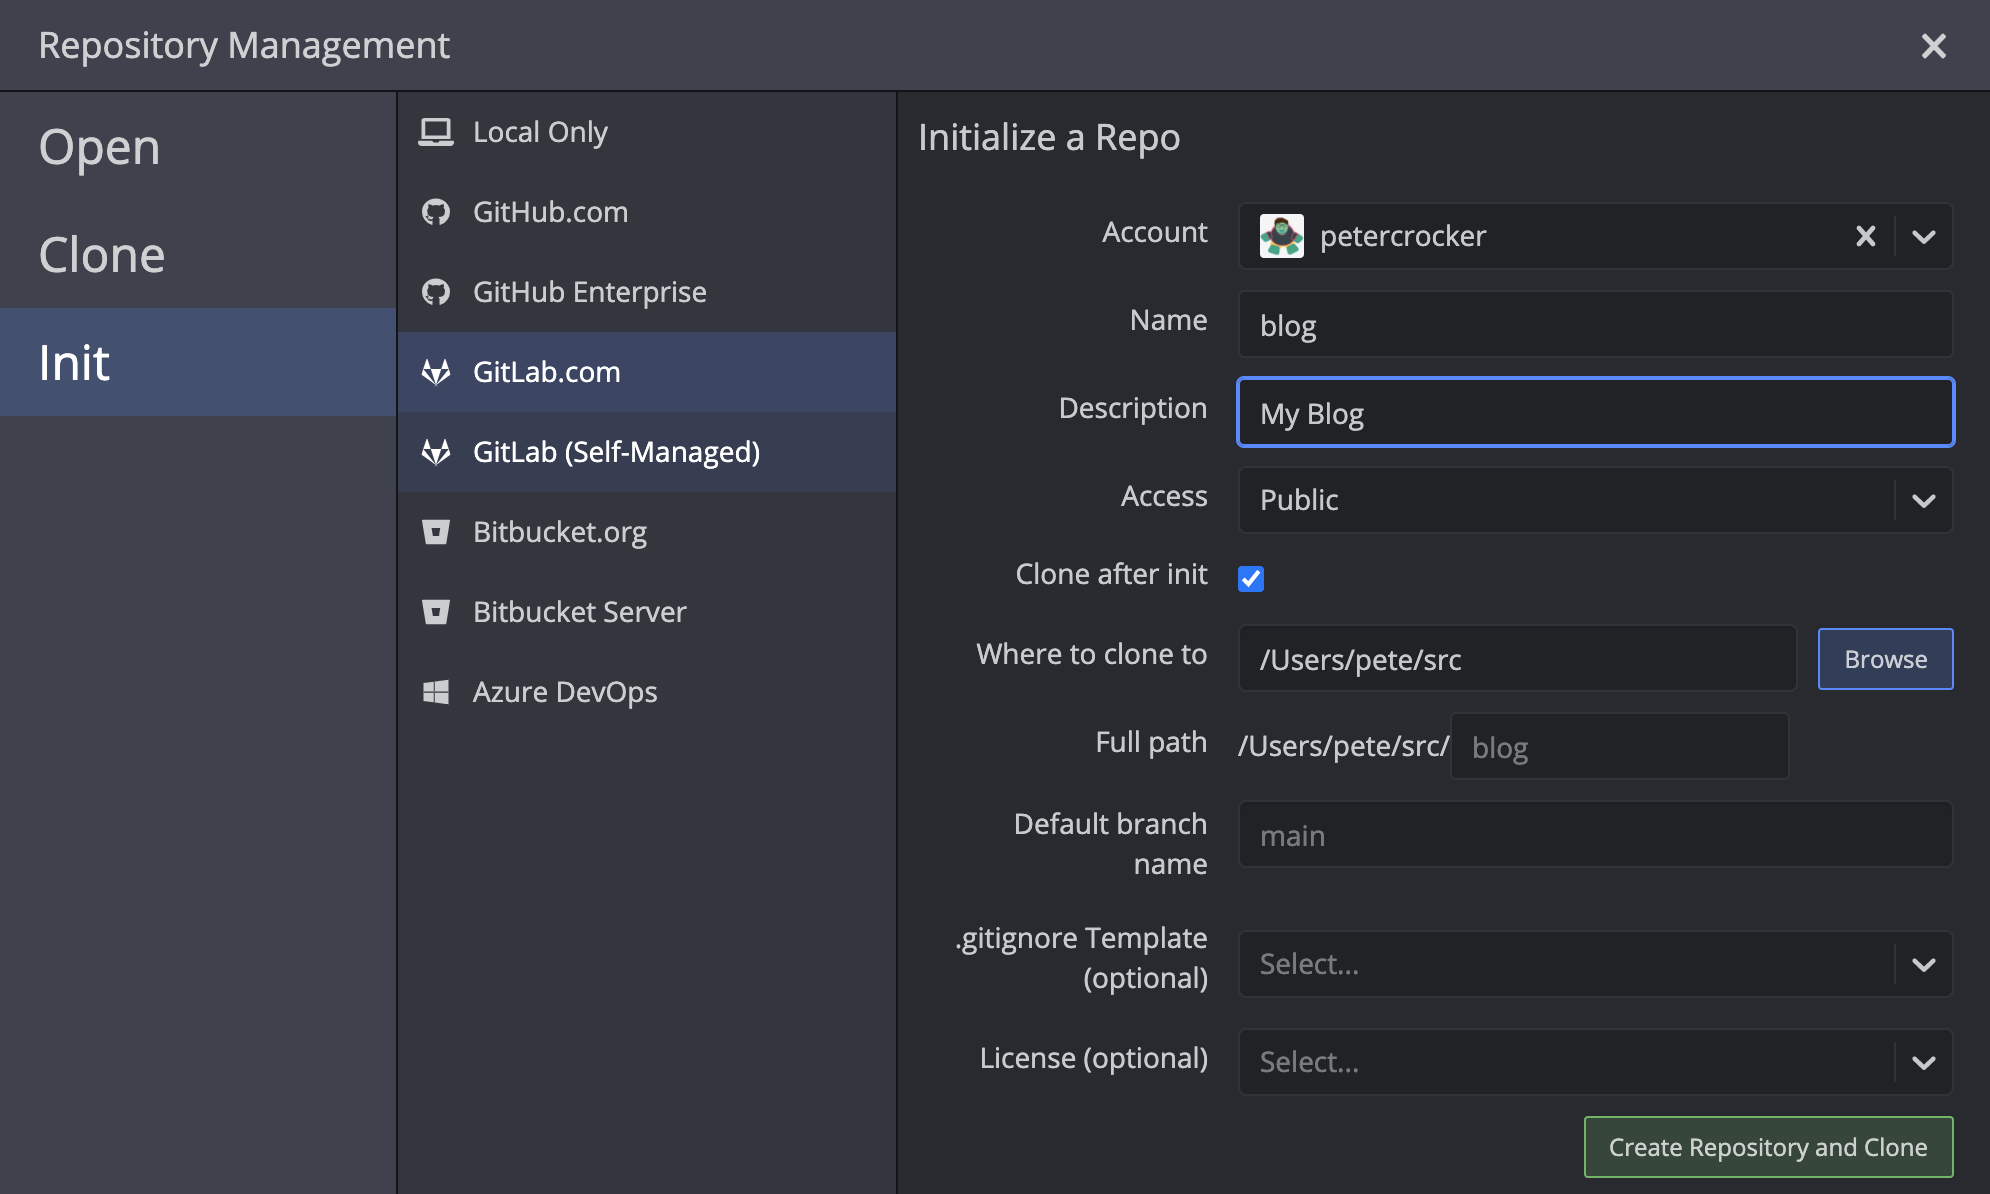
I’m lazy, so I use GitKraken to both create and init my repo on Gitlab:
- Install hugo On MacOS you can use brew:
brew install hugo
- Setup a hugo site
hugo new site blog
This creates the directory structure for a Hugo site.
- Install ananke In your Hugo site directory, run:
git clone https://github.com/budparr/gohugo-theme-ananke.git themes/ananke
Next, edit your config.toml configuration file and add parameter:
theme = "ananke"
-
Create content I’ll leave it as an exercise for the reader on how to create blog pages. You can look inside
themes/ananke/exampleSiteand use that as a reference. Once you’ve created your initial content, we’ll move on to automating the publishing of your blog. -
Test rendering the content
First, to see the content before it’s published to your web server, you can run Hugo locally:
hugo server
Then pull up a browser to http://localhost:1313/ and verify it looks good. Once you’re happy with it, move on to the next step.
- Create a GitLab Pipeline
In your git repo directory, create a
gitlab-ci.ymlfile. This file is used by Gitlab to run an automated pipeline. It essentially builds your website pages and uploads them to your specified webserver.
Here’s my example:
---
image: registry.gitlab.com/pages/hugo:latest

stages:
  - build
  - deploy

build:
  stage: build
  image: jojomi/hugo
  script:
    - hugo version
    - hugo -d public
  artifacts:
    paths:
      - public
  only:
  - master

deploy:
  stage: deploy
  image: alpine:latest
  before_script:
  - apk update && apk add --no-cache openssh-client rsync
  - eval $(ssh-agent -s)
  - mkdir -p ~/.ssh
  - chmod 700 ~/.ssh
  - echo "${SSH_PRIVATE_KEY}" > ~/.ssh/id_rsa
  - chmod 600 ~/.ssh/id_rsa
  - ssh-keyscan -p ${SSH_PORT} ${SSH_HOST} > ~/.ssh/known_hosts
  script:
  - rsync -hrvz --delete --exclude=_ -e 'ssh -p 2222 -i ~/.ssh/id_rsa' public/ "${SSH_USER}@${SSH_HOST}:/var/www/html"
  only:
  - master
Notes on this file:
- It’s separated in to two stages:
buildanddeploy. Thebuildstage uses hugo to take your markdown content in thecontentdirectory, and render it as static html pages in thepublicdirectory. - The
deploystage spins up a temporary docker container, copies your ssh key needed to ssh to your web server, then copies the files usingrsync.
- Setup Gitlab CI/CD Variables
For this to work, the above gitlab-ci.yml file references some variables that aren’t defined in the script for security reasons. They’re kept in Gitlab --> <your repo> --> Settings --> CI/CD --> Variables.
Here’s my example:
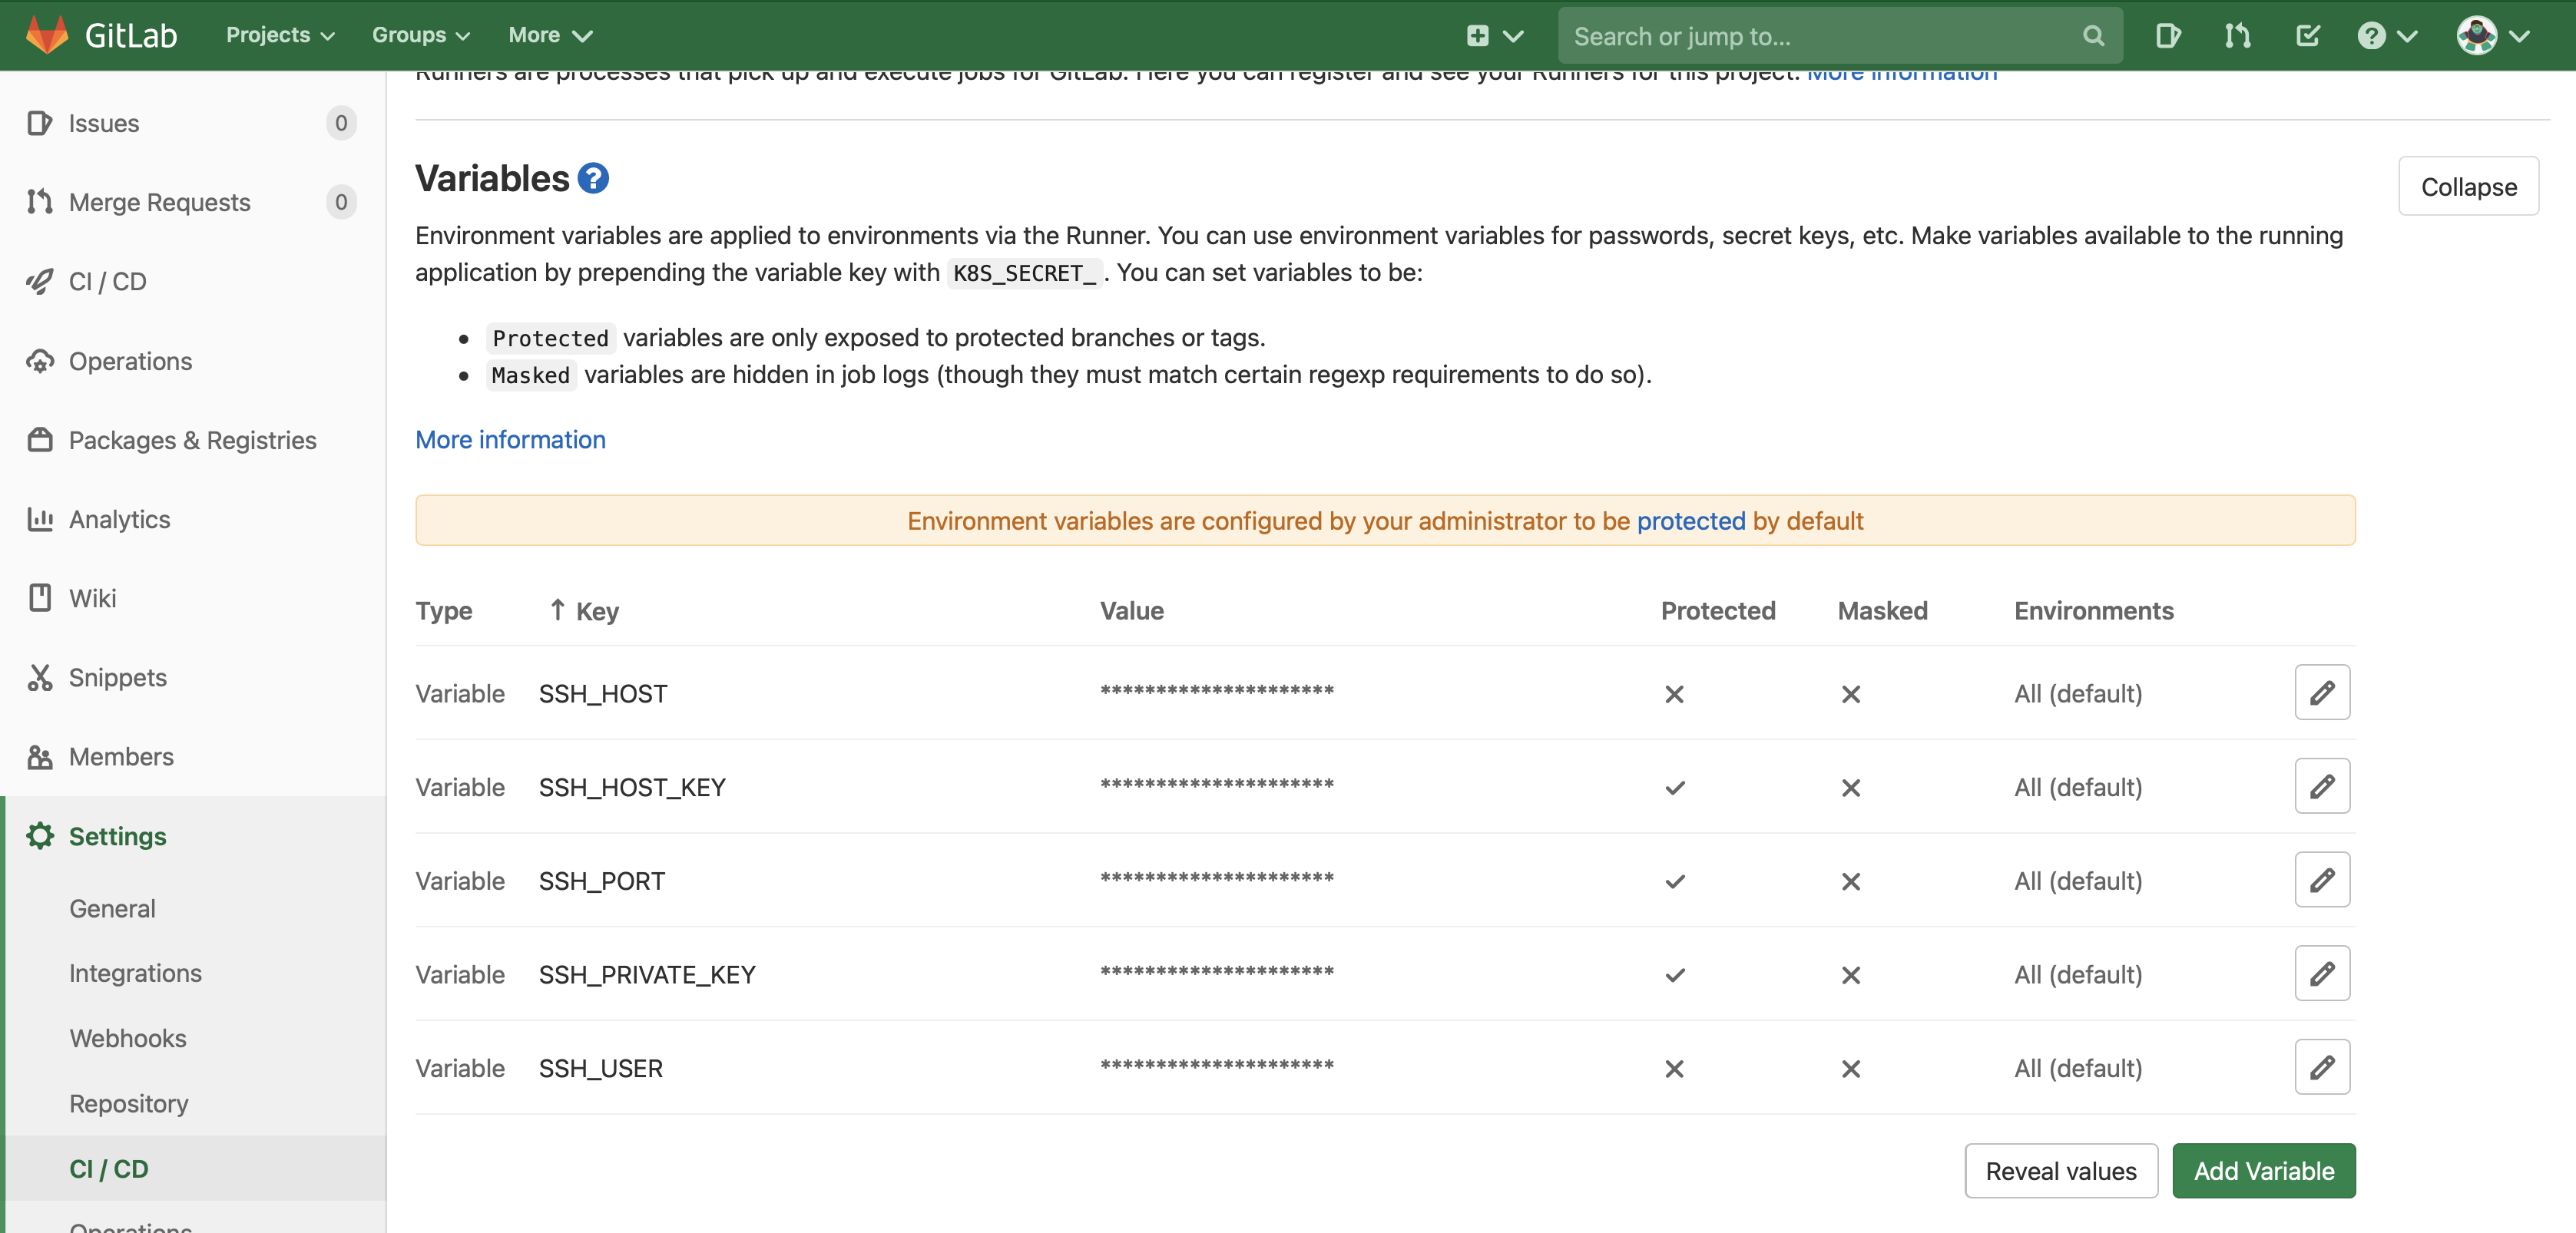
SSH_HOST: This is the FQDN (fully qualified domain name) of the web server you want to upload your blog files to.
SSH_HOST_KEY: This is the web server’s ssh host key. This can be learned by running ssh-keyscan -p <ssh port if not 22> <fqdn of server>.
SSH_PORT: If you’re using a non-standard ssh port number (other than 22), enter it here.
SSH_PRIVATE_KEY: This is your ssh private key that will allow you to login to your web server. Note I recommend setting up a completely different user on your web server, such as gitlabci, generating a unique ssh key for that user, and using that key here. This key would then typically found on your web server in the file ~gitlabci/.ssh/id_rsa.
SSH_USER: The username on the server to login as. If you setup a unique account, this would be gitlabci or whatever username you’ve chosen.
- Test Pipeline
Assuming your gitlab-ci.yml file is correct, then you can test if it worked. You’ll need to push your changes to Gitlab. Here’s an example:
cd blog
git add .
git commit -m "blog update"
git push
Once the push has succeeded, you’ll see activity on the Gitlab pipeline page for your blog: Gitlab --> <your repo> --> CI/CD --> Pipelines.
Here is a view of both stages completing successfully:
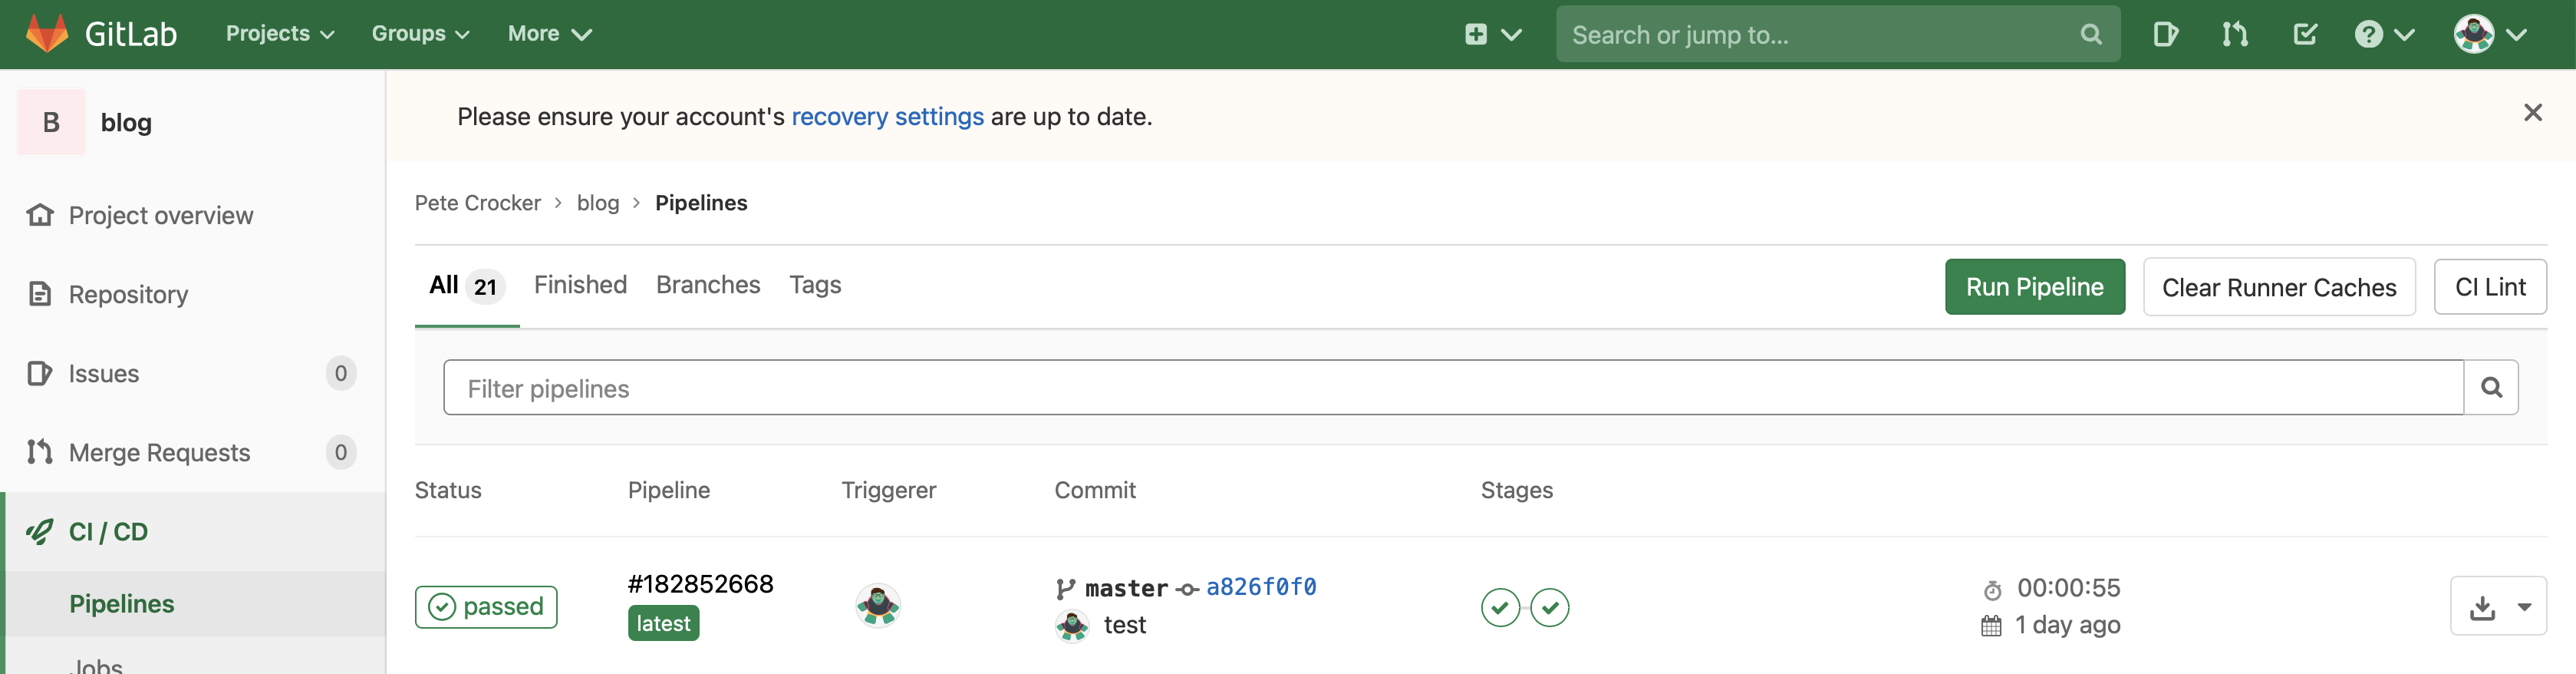
Note if the pipeline has any failures, you can click on the X on a stage to see the debugging information useful to find the problem.
If you made it this far, congrats! You’ve succeeded in automating the publishing of your blog via a CI/CD pipeline every time you update your content.
Because Reasons#
Why Hugo?#
Hugo is a static website generator. This means that it takes simple text pages (usually written Markdown) and renders a full website using statically generated pages. No fancy features, no javascript, nothing to slow your browser down when trying to load the site. The result is a fast website.
Why Markdown?#
Markdown is a lightweight markup language with plain-text-formatting syntax and easily allows rich text (such as formatting and code blocks) using a plain text editor. This means you can write pages with any text editor, and still have enough formatting for easy information consumtion by the reader.
Why Ananke?#
Hugo and Markdown create formatted web pages, but I still want the overall site to be easy to read and navigate. And design matters. As the focus of this blog will be publishing code examples, I’ve chosen the Hugo theme Ananke to make it simple for me to publish blog entries that are clean and readable.
Why GitLab?#
As it’s primary role, GitLab is a SCM (source code management) tool and website. It allows you a place to store your code or web pages, share them with others for collaboration, and tracks changes of the files over time. For a blog, it’s a simple way to have a time-based archive.
In addition, GitLab was one of the first SCM websites to allow for simple and free CI/CD (continuous integration / continuous deployment) pipelines. A pipeline is essentially automation that runs when your files change. If you create a new blog page, and push those changed file to GitLab, magic happens. In the case of my blog, GitLab will run Hugo, automatically generate static web pages, then push those generated web page files to my web server.
I prefer GitLab because of it’s clean and navigatable UI, especially when having to troubleshoot why my pipeline fails.
Why VS Code?#
To write code or markdown, you need a text editor. I prefer to use an editor that’s both cross-platform as I write on both MacOS and Ubuntu Linux. In addition, having an editor focused on code development offers a number of advantages:
- Syntax Checking - Be it markdown or ansible or vagrant or python, I want something to quickly spot my mistakes
- Git Built In - I can quickly publish my changes to GitLab
I have a number of VS Code Exensions installed:
- Ansible
- Better Jinja - Jinja2 template syntax support for ansible automation
- Cobalt2 Theme Official - My preferred colour theme
- gitignore - Simple creation/modification of .gitignore files
- Graphviz - For spinning up a complete Cumulus Networks network matching production deployments
- Hosts Language - Linux /etc/hosts file syntax support
- Markdown All in One
- markdownlint - Checking markdown pages for syntactical correctness
- Marp for VS Code - Creating simple PDF presentations from markdown files
- Python
- Remote - SSH - Allows editing a git repo on my server instead of locally on my Mac
- Settings Sync - Syncing VS Code settings between my Mac and Ubuntu workstation
- systemd-unit-file - Linux systemd syntax support
- Vagrantfile Support - Support for Hashicorp Vagrant file syntax
Why GitKraken?#
Git is hard. I don’t ever want to be a git grandmaster. I just want to get my job done. I’m fine with not remembering all the git command line options. GitKraken makes it easy to initialize repositories, deal with multiple branches, and especially merges and pull-requests. It offers a nice UI on multiple platforms.